In an earlier post, we wrote about why and how Lists became Sheets.
Here, we’ll give you a more detailed tour.
Five stops: Making a Sheet, which now happens on the page itself instead of in a form. The check-in methods, all of which now sit behind one button, including the ones most people never found out we had. Settings, which used to be spread across three separate places and are now one window with a live preview of what your visitors will see. What hasn’t changed at all. And lastly, what we’re working on next, based on the feedback we’ve received from you.
Creating a Sheet
Click the plus icon next to the sheet name to create a New sheet. The page doesn’t go anywhere. It dims and the fields you need appear exactly where the finished thing will be: the name where the name goes, the schedule where the subtitle goes, the People where the roster goes. You’re filling in the Sheet itself rather than filling in a form that will eventually become one.
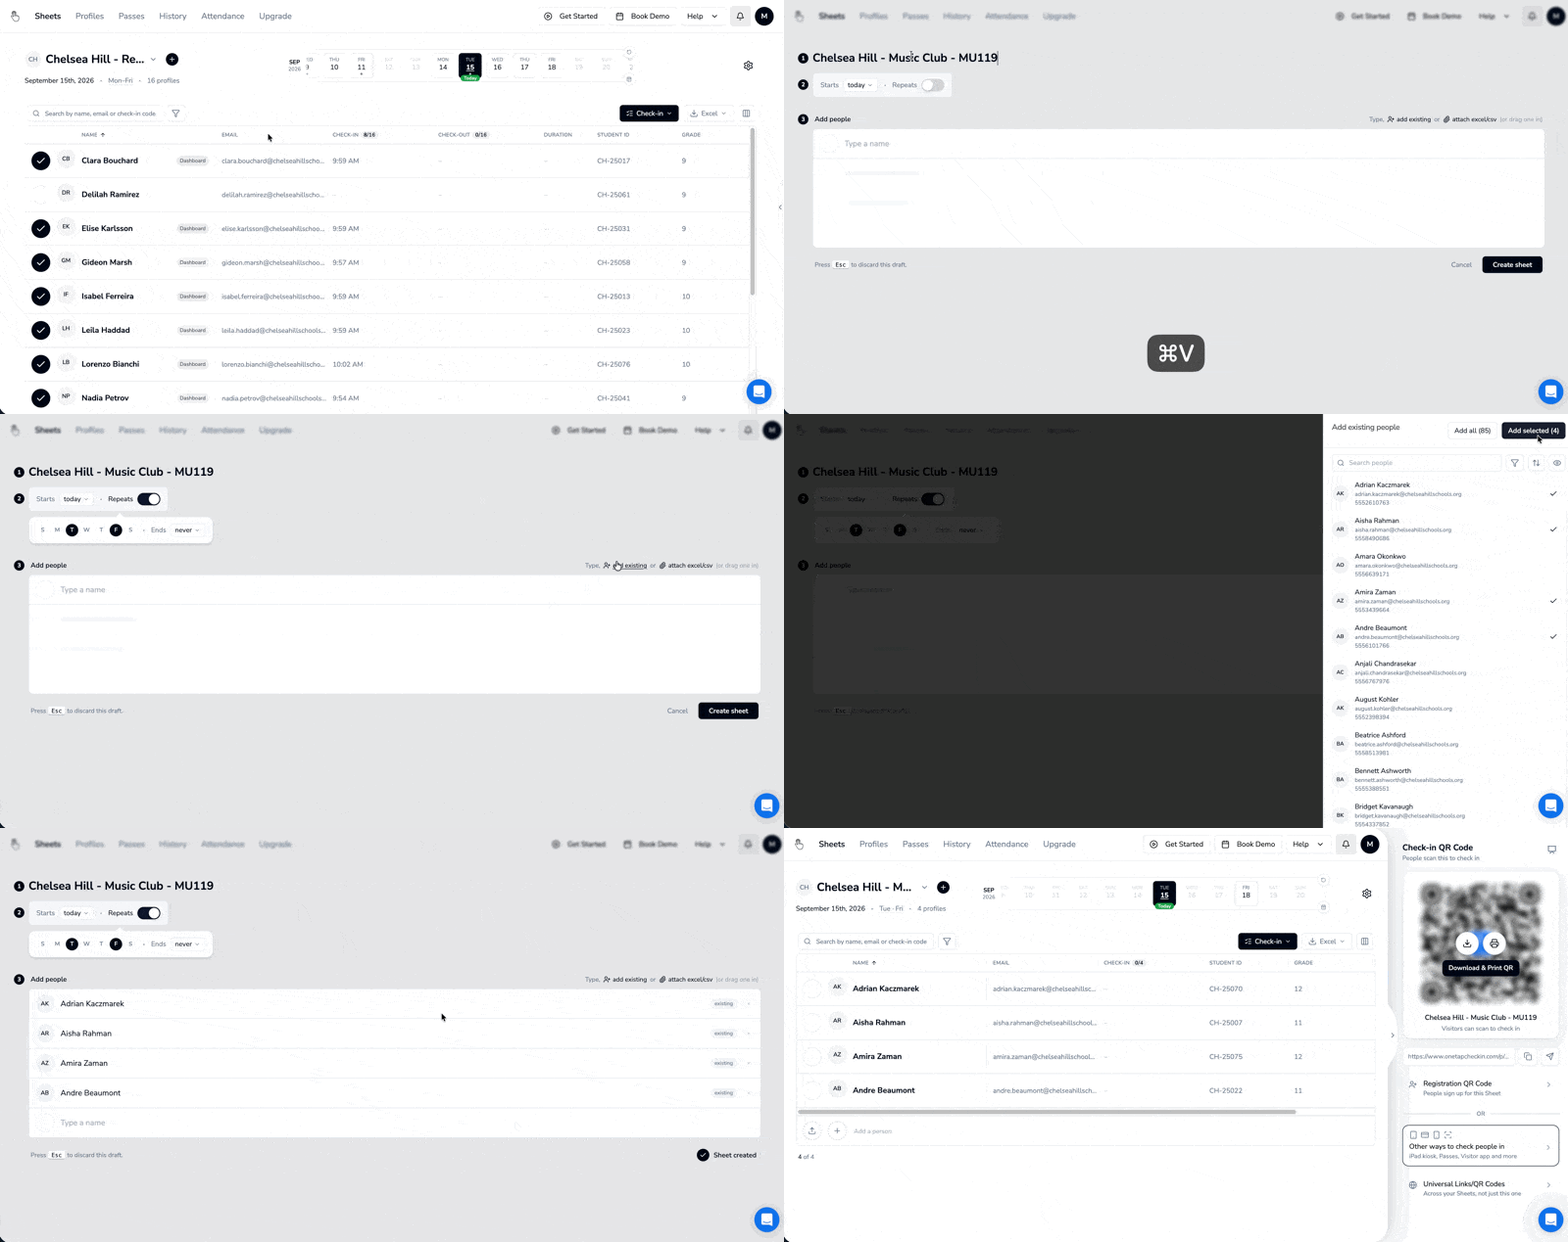
There are three steps, numbered down the left so you can see how much is left.
First, name it.
Second, the “when”. It starts as a single date, and if the thing repeats, flip Repeats on and pick your days. If it has an end, you set one. If it doesn’t, you don’t.
Third, People. You can type names one at a time, Add from existing Profiles on OneTap, or drag a CSV onto it. We’ll show you a preview after uploading a CSV if you choose to do so, so you can set which column means what, which columns to ignore, whether to create new custom fields, etc.
You can also add people later, after creating the sheet. Where? At the bottom of the table by clicking the + or upload button or simply typing in names where it says “Add a person”.
What you end up with is an attendance sheet in the plainest sense of the phrase: one page, one roster, the thing you pick up again every time that class or shift or visit comes round. That’s where the name came from, and it’s about as literal as we could make it.
Your QR code, and every other method of checking people in
The moment a Sheet exists, its QR code opens for you in the drawer. Not buried in a menu you have to go hunting for, just there, with the check-in link beside it and a Download and Print. If you close it, it’s back in the Check-in dropdown under Show QR code.
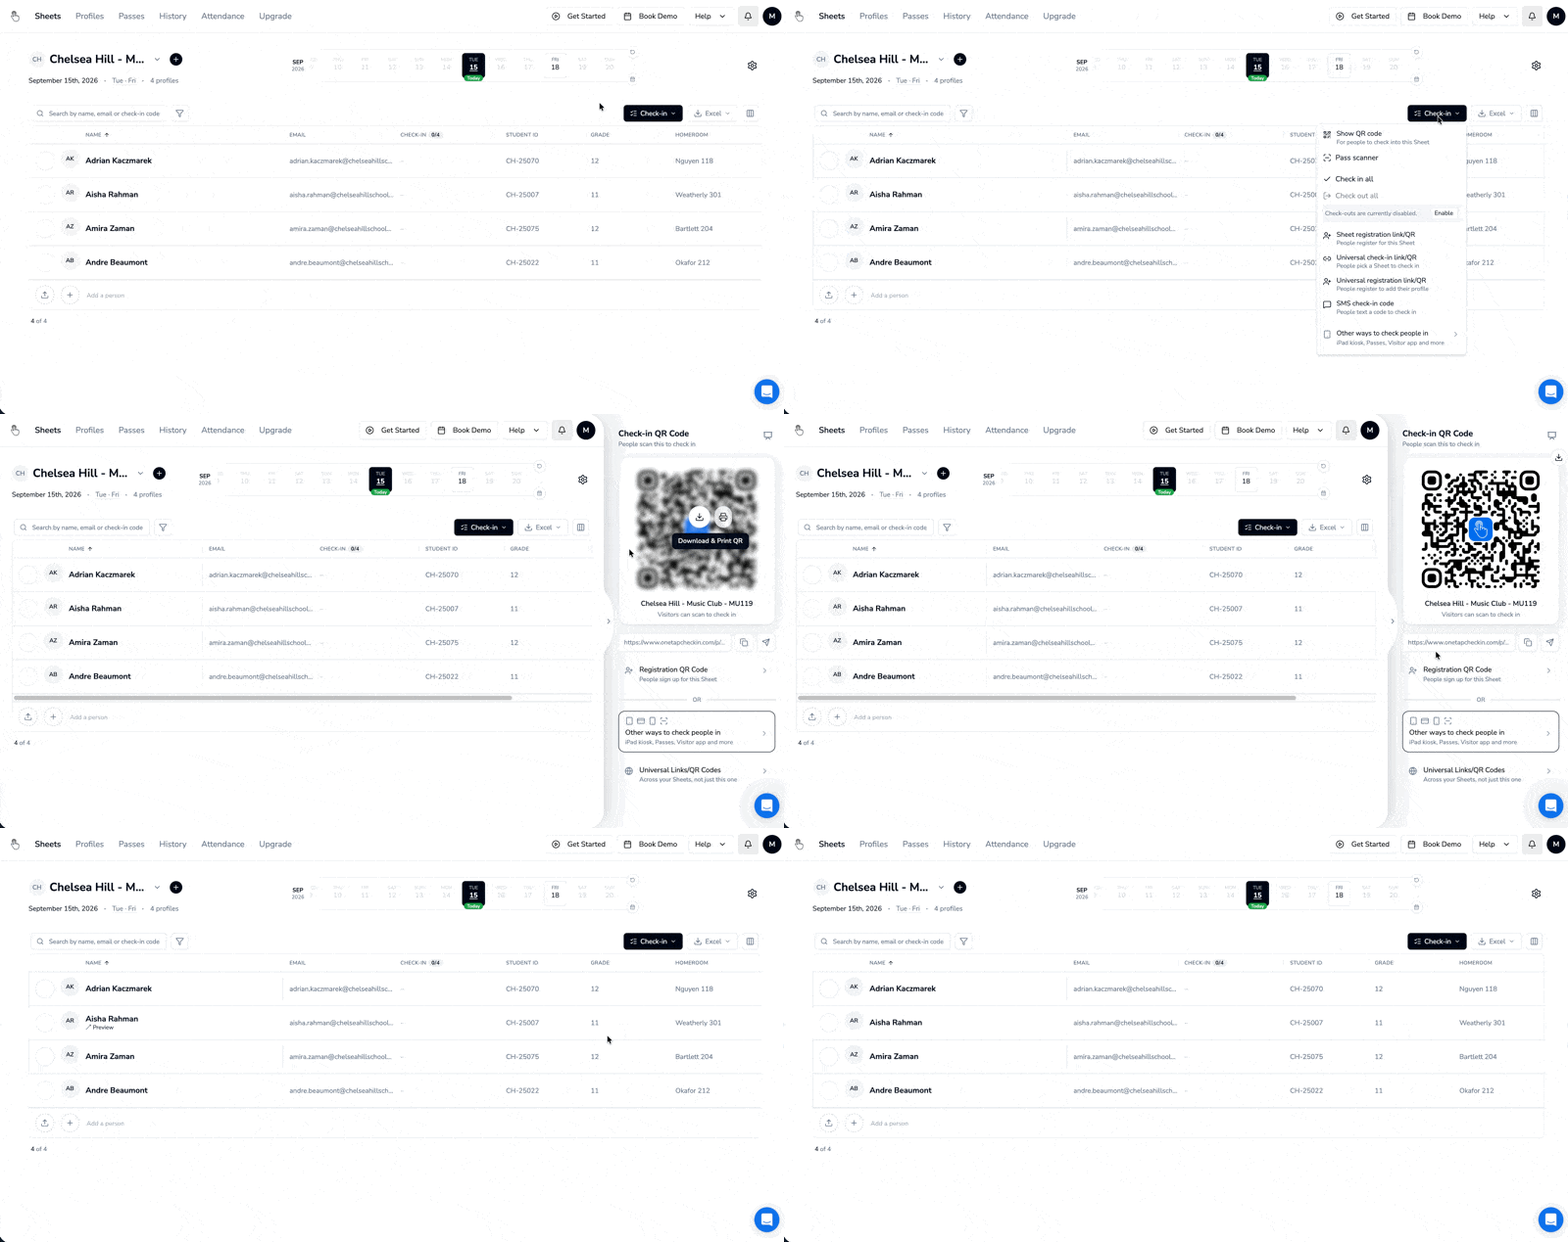
The QR code is only the most popular option, though. There’s a link you can share, an iPad kiosk by the door, a Pass in someone’s digital wallet or printed out, the admin app in a manager’s pocket, and your own screen with a list of names on it. These would be shown to you only in demo earlier.
They’re in one place now. You get to go through all options and pick a check-in method that works best for your workflow.
The black Check-in dropdown button holds everything you send or do in the moment: check everyone in or out, show the QR code, copy a check-in or registration link, open the web kiosk.
At the bottom of it is Other ways to check people in, which opens a drawer down the right-hand side of the page.
The drawer is the catalogue. It holds the setup steps. Each one says what it is, what it needs and how to get it going. Nothing in there asks you to commit. Open it, read what’s there, and take the one that fits you best.
Settings, in one window
If you wanted to change what a visitor saw when they checked in, you used to need three different places. List Settings held the name, the schedule and the check-in method. The check-in link had its own settings behind the Share menu. Registration had a third set somewhere else again. All three were shaping the same list, and which one owned which setting was mostly a matter of memory.
That’s one window now. Tabs up top, settings below it, and a live preview on the right showing the visitor’s screen updating as you change things.
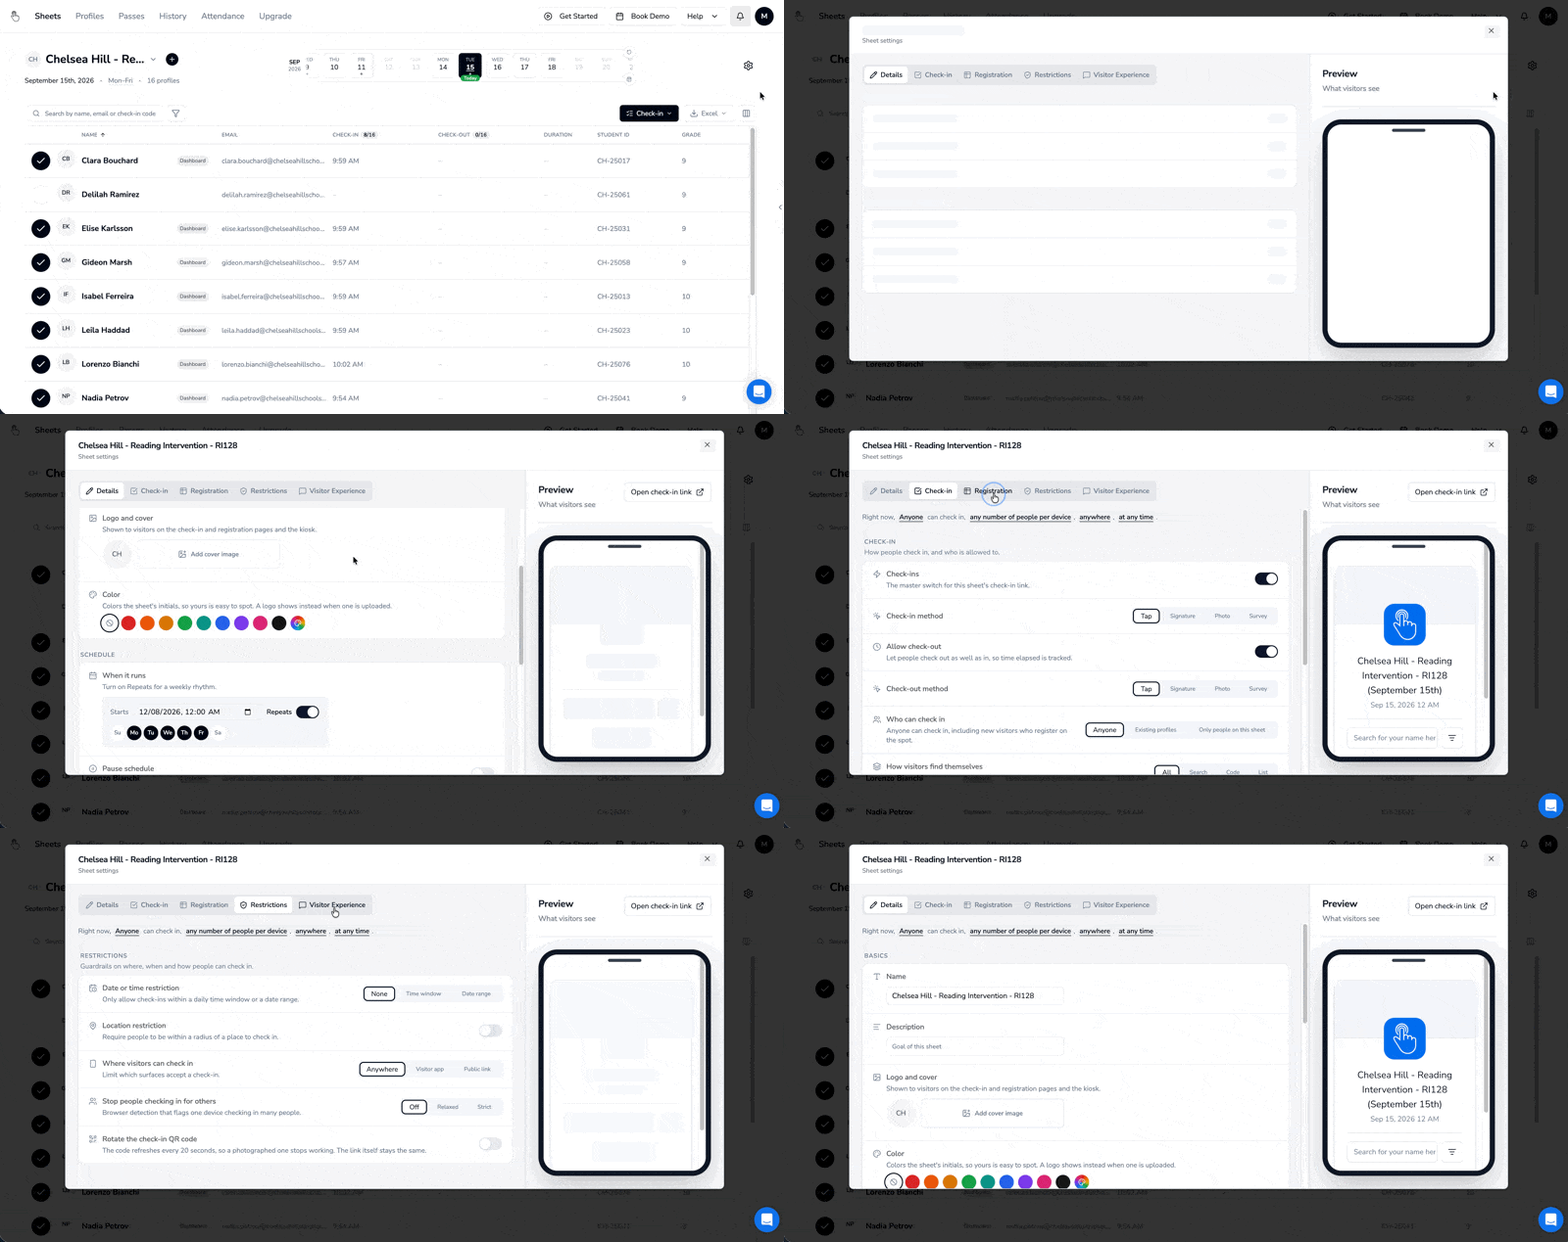
One more thing lives up at the top of that window, in plain English: “Right now, anyone can check in, from any device, anywhere, at any time.” Every bold part of that sentence is a button. Nobody wakes up wondering whether they can restrict check-ins, but everybody who reads “anywhere” wonders whether they can change it. Click it and you get a map with your radius drawn on it, sized in rooms and buildings rather than in metres you have to guess at.
And a lot of it hasn’t moved at all
A redesign can read like everything’s up in the air. It isn’t. This was a rearrangement of where things live, and not a rewrite of what OneTap does.
The other tabs still keep the same structure. People, Passes, History, and Attendance still stay the same.
No effort will be required from your side. All your Lists, People, Passes, and Attendance History will be available on Sheets. Your existing QR codes and links keep working. Nobody needs to reprint or reshare anything at all.
The short version: same product, same check-ins, fewer places to look.
We’re listening to the feedback!
As we go about this change, we are building with you, the actual user. Over the past few weeks, we have been learning from your feedback and making changes accordingly. We started with the confusion of “I just want to track who comes in and goes out, why do I need to know what recurring lists and child lists are?” to build Sheets. Now we’re also iterating with you.
The next few feedback items we’re trying to solve for:
“I want an overview of everything going on in my organization. All lists/sheets, number of check-ins on each, which collaborators are responsible for each, etc.”
“I want to see an overview of check-ins on each Sheet across a calendar. I could do that before, but now I have to go to each date to see number of check-ins”
“I want to see who’s not here at all. I want to see who has not checked out.”
“I want to see a summary of the last few days for each student on my sheet.”
Once these are out, we will link a post here walking you through those as well.
If you have more to say, please reach out to us using the blue chat icon on the bottom right of your dashboard. We appreciate all the feedback we can get.
That’s the walk. If you’ve got a Sheet running and something in here is hiding from you, tell us where you looked for it first, because that’s usually the more useful half of the bug report.
Thanks for reading! 